5. Tons of Trusses and a Plethora of Plywood
Back | Top |
Next
Sent: Saturday, 23 Mar 2002
All,
It's been a long time since I dumped you a bunch of pics of the house. For this I
apologize--at least one of you wanted to know if I was still in action or not.
But it seemed like I was "in the middle of it" and I didn't want to show you
a work in chaos.
These pictures show three months' worth of putting on roof trusses and encasing both the
roof and walls in plywood. I was able to do a fair amount of this myself, especially
once I invented what I call a "plywood ramp" to let me push a bulky piece of
plywood up onto the roof, while safely on the ground, and have it held in place long enough
for me to scramble up a ladder and grab it from on top. Unfortunately, it worked best
when at least one row of plywood was already in place, and that was annoying for my helpers
to deal with--enter the "plywood hooks" that helped hold a piece up long enough
to nail it down.
I'd like to acknowledge the help of Tom Preble, Gary Fish, Chaz Jarocki and most especially
Mike Fay. Putting trusses up was basically a two-man job though it worked somewhat
better with three. Without help from these folks it would be literally impossible for
me to have gotten to where I am today (frazzled but the proud owner of a big plywood box).
The basic idea here is to put the roof trusses up, and put some of the roof plywood on them as
we go along. I did not want to repeat the dufus stunt I have seen some professional
builders pull: Put all the trusses up, put some flimsy bracing on, then schedule a day
off by arranging for high winds. Of course they get to redo the trusses the next time.
By putting plywood on as we go, this is avoided. (Given the way we occasionally get 75
MPH/120 KPH winds ripping through here it seemed prudent, anyway.) Also as this is going
on, it's necessary to put plywood sheathing on the walls. The wall plywood is slightly
thinner than the roof stuff but is actually more annoying to put on--you're nailing horizontally
rather than down, and up near the roof and down near the ground you have to be careful not to hit
something other than the nail.
Needless to say, hitting the thumb, thereby causing lots of loud yelling (and bleeding at least
once), is _always_ a hazard.
One interesting wrinkle was having to frame in the west wall--you'll see that in progress below.
I also had to do a covered entryway.
A note about the pictures--last time around I sent "large" pictures with very poor
resolution. I didn't realize how bad until I looked at the copy I sent myself. (My image
editor for some reason continues to display the picture at high res after I save at low res--
fraudulent!!) So this time I'll try something different--dinky pictures with at least some decent
resolution. So they'll be just as cheesy but will look better.
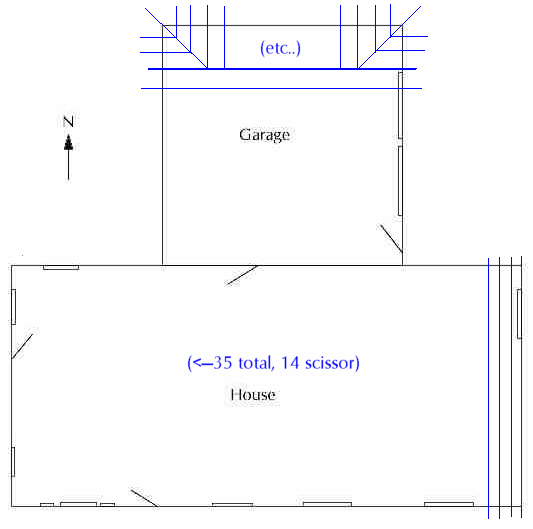
1. Anyhow, here's the diagram from last time around, with some blue lines--those represent examples
of where the roof trusses had to go. The 14 scissor trusses are the ones that go
over the cathedral ceiling in the Great Room--you'll see what that means.
The general game plan is to start at the east end of the house, work towards the west, then
start with the double-thick truss on the garage (the thick horizontal blue line), put in all
those perpendicular and diagonal trusses, then move south from the thick truss. Where
the garage roof meets the house, there are "valley trusses" that actually rest on
top of the house roof. (You'll see what I mean--a picture is worth 1K words.)
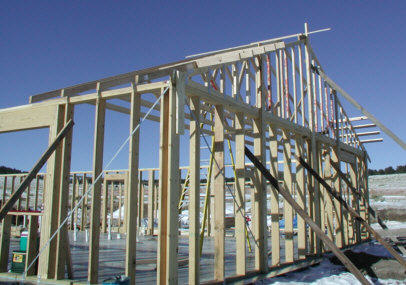
2. Here is where it starts... 1 December. Tom, Mike and I managed to get
the "gable end" truss up, where the boards I had nailed to the wall caught
it. Then three more trusses. Now there is enough to put a sheet of plywood on
(which hasn't been done yet in this picture). More importantly, some of the
"lookouts" extending out over the end of the roof have been put in. On
this day, we'd carry the truss in upside down, then someone crazy enough to stand on the
top step of the ladder while pushing up and sideways would rotate the truss up and into
place. I am crazy, but not that crazy--I almost had a heart attack watching TOM do it.
Note that the walls are braced, and so is the top of the truss. At this time there is
NOTHING other than those braces to prevent the truss from wobbling around a bit, leaving me
with a slant-walled house (or a pile of busted trusses if I am really unlucky).
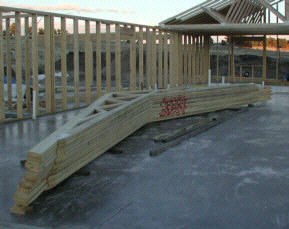
3. 7 December--now 12 trusses are up (upper right). In order to get to some of
them, we had to move the scissor trusses out of the way, so here they are in the middle
of the floor. They look rather like gigantic boomerangs so of course we joked about
the "Australian artillery shells."
You can see a dark area on top of the trusses--that's three rows of plywood. But
it's still kind of scary because the walls of the house are themselves not really rigid
yet--I need to put some plywood on the wall corners to stiffen them up a bit.
By this time, Mike and I went to a different mode of operations. We'd carry the truss
in upside down, like before, but we'd tie a rope to the apex of the truss. I'd then
go out to the east side of the house and pull on the rope to rotate the truss up, while Mike
got it started by pushing up on the point with a board. No scary pushing sideways from
the top step of the ladder!
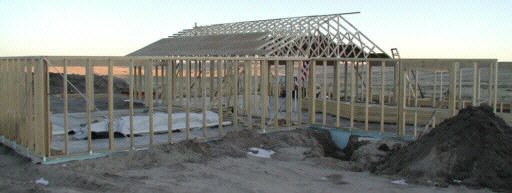
4. 8 December. Here's a view from the northwest, with 20 trusses up. Only one
more "common" (flat-bottomed) truss to go. Still three rows of plywood.
You can see that they are arranged like bricks in a brick wall.
Sometime on that day, while Mike and I were flipping up a truss, it snapped. It actually
smacked Mike on the head but not at all hard. The wood where the break was actually
looked like a small explosion had occured there. The two halves of the truss are
behind the Australian artillery shells. I had to have someone come out from the
trussmaker and fix the truss.
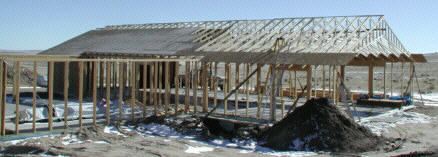
5. The next weekend I didn't have help with trusses, so I put up wall sheathing in the
northeast and southeast corners (you can see that here). With this job there was NEVER
a shortage of "other stuff" to do if I couldn't do the trusses themselves--for
one thing there was always more roof plywood to do.....
On the 22nd and 23rd the last house trusses went up. The 23rd especially was a bitter
cold day to start with but warmed up later. On the 22nd Chaz and Mike helped, on the
23rd it was Chaz and Gary. I was starting to get concerned about the high
turnover rate.
Note that the west end of the house is a big gaping hole. Note also one row of plywood
along all those scissor trusses (though if I recall we put a bunch more up that afternoon).
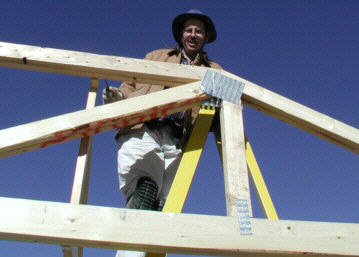
6. 26 December. Now with the house trusses in place, it was time for the Mother Truss
(ominous music sounds). Mike and I had to move it out of the way once, and because
it was double thick, we could barely move the doggon thing. The idea of somehow lifting
it up onto the top of the walls was ludicrous. Fortunately, Tom owns a multi-ton yellow
power tool known as a "backhoe." Even so it was just _barely_ large enough to
lift the sucker onto the tops of the garage walls and slowly jockey it into place.
I then immediately put two of the perpendicular trusses on to help brace the Mother Truss.
Since Tom was there he was able to take this picture of yours truly nailing the top of the
perpendicular truss to the Mother Truss.
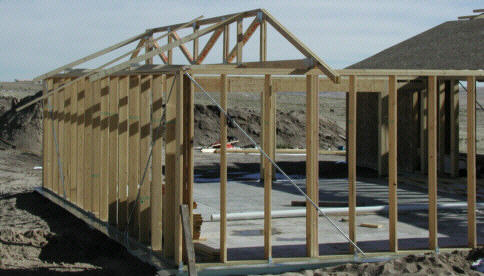
7. 26 December. Here's a more educational perspective on the mother truss--complete
with the two perpendiculars and one other piece of wood to make sure I won't have to pick
the truss up again. Over on the right I believe the house now has four rows of plywood
on the roof.
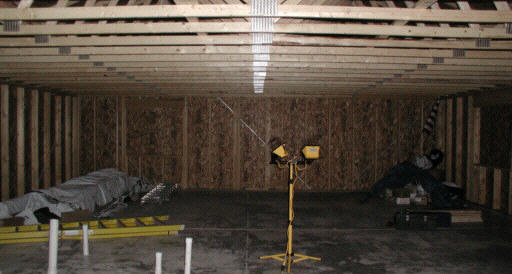
8. 27 December. Meanwhile I'm also doing the much less glamorous work of putting
the wall plywood on. I took this picture shortly after dark and it shows the east end
of the house filled in. It's starting to become meaningful to talk about
"inside" now.
It's hard to see but on the left side of the wall is a window, but it's covered with
plywood. Given the way snow blows around sometimes, it's a good idea to keep the windows
covered as long as possible. It's truly annoying having to shovel the snow out of
the house. In fact I don't plan to cut the window holes out until just before I put the a
ctual windows in.
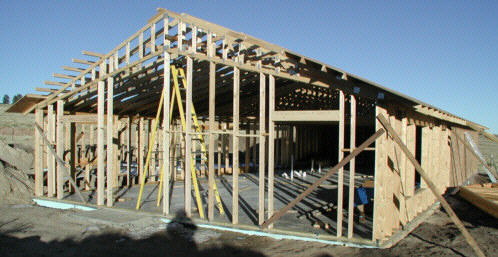
9. 3 January. I can't really put any more plywood on the roof until I frame the west wall
in. That's because the truss on the very end sags (it isn't made out of triangles).
When I put the first couple of pieces of plywood on over the edge, it bounced a _lot_. It's
a bit disconcerting feeling the surface you are kneeling on go "bounce" every time you
hit the nail with the hammer. I realized I had to frame the wall under the truss to keep
this from happening. This involved a lot of custom cutting. Here I've managed to put
almost all of the "kingposts" in (those are the studs that reach all the way from the
floor to the truss). Other studs ("trimmers") have to prop up the tops of the
windows; yet more studs have to go from the tops of the windows to the bottom of the truss,
and _under_ the windows. In this picture I have not done any of those yet.
This was a very tedious and time-consuming task.

10. 5 January. Now back to the Mother Truss (ominous music, once again). I've put
the rest of those perpendicular trusses on, and the two diagonals. The little trusses
that attach to the diagonals have yet to be done here.

11. 26 January. It's been a while since the previous picture. I know Mike
and I had a little time one day to put up four more trusses somewhere in there. On
the other weekends Mike had scheduling conflicts although--like I said--there is always something
else to be done.
For instance, I obviously put more plywood on the roof of the house --all the way up in some places
as you can see here--and on the walls. Note the one sheet of plywood on each side of the
garage.
It should be obvious now why the mother truss is flat-topped (like a Pizza Hut restaurant).
The next four trusses have smaller and smaller flat tops on them. The roof comes to a peak but
here that truss is not yet in place. (You can see the board sticking out over the top of the
talles truss.)
It took me quite some time to put the boards in which go up over the flat tops (purlins).
There was a lot of finicky custom-cutting to do and the trusses themselves had been braced in
slightly "wrong" positions. So I had to remove the bracing on one side, put
some of the purlins on, then go to the other side and repeat the process. Those nine bits of
wood took me an entire day.

12. 2 February. On a whirlwind of a day, Mike and I got _all_ of the remaining trusses up and
even got a lot of plywood on all three sides of the garage roof. We very carefully measured
out where the valley trusses had to go and nailed them to the top of the house roof. It
looked like I was done with trusses and could just mess around with plywood.
It wasn't going to be easy, though--the garage roof has all those diagonals in it, and so about half
of the plywood has to be cut to fit.

13. 6 February. Inside the house looking west. I've covered the west wall except
for the gable end. I believe that this was also the day I completely finished the framing.
As you can see it tends to get cluttered inside. Also if you look at the ceiling you can see
light on the trusses--the roof is still open a bit on this end.

14. Here's the hole in the roof. It was interesting, sometimes, to look up and
see the repeating geometric patterns in the trusses--a neat latticework.

15. 17 February. A bit more careful work on the garage roof--I've managed to get
two rows of plywood done--including the corners. I was working on the third row, when it
became apparent that there was a problem with the valley trusses. They were spaced a bit
too far apart and the plywood wasn't reaching. I was used to an occasional discrepancy on
the main house, but this was a consistent pattern. I had to tear some plywood off the roof
and remove five of the valley trusses.
Negative progress is _always_ rewarding! (I think the sarcasm buffer is about to overflow.)
Very much on the plus side, however, that day I finished the roof over the house.

16. 23 February--I've bounced back from the setback and now the apex of the garage is
down to a little hole.
As I put the valley trusses back on, I made sure that they "fit" the plywood. I
didn't try to put them all on and then see if they happened to be in the right place. The
third row of plywood brought in two more trusses and I made sure that they were consistent--then
I did the fourth row. Doing it this way of course made it impossible for me to take another
picture like #12--I didn't put the last truss on till I was ready to cover it.

17. 6 March--one little piece left on top of the garage roof. Almost all the plywood
is on the walls (though I have to nail some of it some more). So it's time for another
picture of the car in the garage. Shouldn't take too much imagination now!
Actually this is the night I just popped out to the site and took some pictures of the inside. It
occured to me I hadn't done so in a while, and at this point I was very close to finished. I
had even done most of the gable ends by this time.
NOTE: Those pictures I sent to a friend and that e-mail is reproduced here as "Inside Interlude."
(Needless to say this paragraph was not part of the original e-mail!)
Hey, it's about time I satisfied those of you more interested in interior decorating. As you
can see from this picture as well as the next ones, my work is cut out for me!

18. Also from the 6th. Here's the great room, complete with cathedral ceiling.
Dining area and kitchen on the right, living room on the left. Note that the gable is filled
in! I've also tidied up quite a bit.

19. Another one of those pictures from the 6th. Here is "Sherwood forest" a
gain. Most of those pipes are in the future bathrooms. Obvously they need plumbing
and walls--otherwise they will be very "public" restrooms.
By this time almost all the walls are done. The east gable end still has an opening and
there is a bit of detail work around the garage doors. There is still a small hole in the
garage roof. And there is a large hole around the front door. That's because I have
to put a covered entryway there and it's easier to put the supports in if the plywood isn't in
the way.

20. Yet another picture from the 6th--the glow inside is the work light from picture 19.
The hole is eight feet (2.4 meters) wide, seven feet (2.1 m) tall, and the bottom of it is 8 1/2
feet (2.5+ meters) off the ground. It wasn't fun getting a sheet of plywood up there and not
having it fall away from the wall and onto my head. (On the west side I did have one come
crashing down once--nice adrenalin rush. I came up with a couple of tricks that helped
enormously. Of course I have no idea how well they will work when it's time to do the siding.

21. March 10th--a little after 1 PM. Tom came over and was able to take this picture.
That over there is the LAST nail on the roof! Murphy even stayed away long enough that I did
NOT bend the nail while Tom was taking the picture (I was half expecting that to happen).
The next weekend, I put on the supports for the covered porch and covered the front door area (as
shown in picture 22). I left the doorway itself open.
March 18th I was inspected for "wind shear." Essentially making sure I put enough
nails in the plywood.
As soon as the inspector left, I nailed a badly-weathed piece of plywood over the opening so snow
and wind won't blow through. Of course I can remove the piece whenever I want to get through
the door.
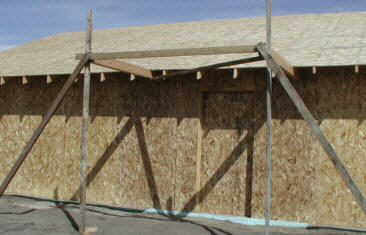
22. 22 March Here are the supports for the covered entryway. I've braced the
front end of them (I can't put the real pillars on until the ground thaws).
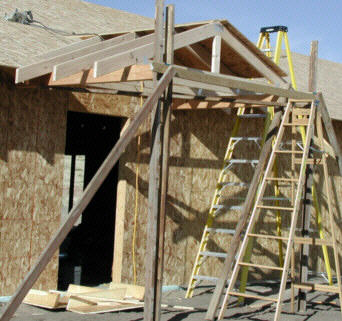
23. Later that day... Four trusses I built myself, and a couple of ladders.
I've even got some plywood up.
On the ground you can see part of the roof overhang I had to cut away to do this. I
had to cut into the roof I had slaved away on--that hurt.
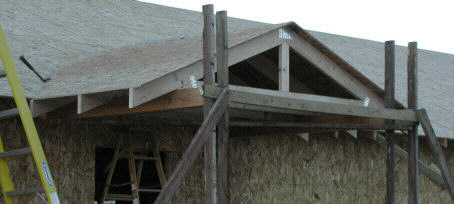
24. The result (a little later): One covered entryway.
Well, now it's time for the permanent roofing cover. The materials were delivered today
(the 23rd). I have some more work to do before I am really ready to start that, so it's
just as well that the wind picked up just after the materials arrived!
For one thing, I have to put on "fascia board"--that's the thin strip of wood that covers
the ends of the trusses. Eventually the gutters go on this piece of wood.
There is a distinct sense of urgency to my getting the permanent cover on. Every time it snows,
the snow damages the roof plywood. It tends to melt, drip inside, and freeze on the concrete
floor. So some days it seems I have an ice skating rink.
Unfortunately the weather must cooperate for me to get the permanent roof on. The roof must
be dry and the wind can't be blowing too hard. And the way it works I probably need two days
of perfect weather (no precipitation, very little wind) in a row to do any meaningful amount of work.
And we are now heading into what is usually the snowiest, windiest season of the year.
This will be LOTS of fun!!
Steve
Back | Top |
Next


